


Need a way to accept appointment bookings on your WordPress site?
In this post, you’ll learn how to set up a flexible appointment bookings system based on Easy Digital Downloads and the recently revamped EDD Bookings plugin.

For this tutorial, we’ll focus on the use case of using EDD Bookings, alongside our Clinic Pro theme, to create an appointment booking system for a dentist. With that being said, the principles in this tutorial are by no means limited to that use case.
One of the perks of EDD Bookings is its flexibility, so you can really use it for…pretty much any type of booking. Medical clinics, personal trainers, location rentals, spas…it’s all fair game.
Keep reading for an easy step-by-step tutorial!
What You’ll Be Building – Appointment Bookings In Action
Before I show you how to start accepting bookings with your WordPress site, let me give you a quick demo of what you’ll actually be building.
Our Clinic Pro WordPress theme plays nice with EDD Bookings out of the box, so nothing you see here required any custom CSS. This is all using the default styling options that come with Clinic Pro and EDD Bookings.
Here’s how the appointment selection process works:

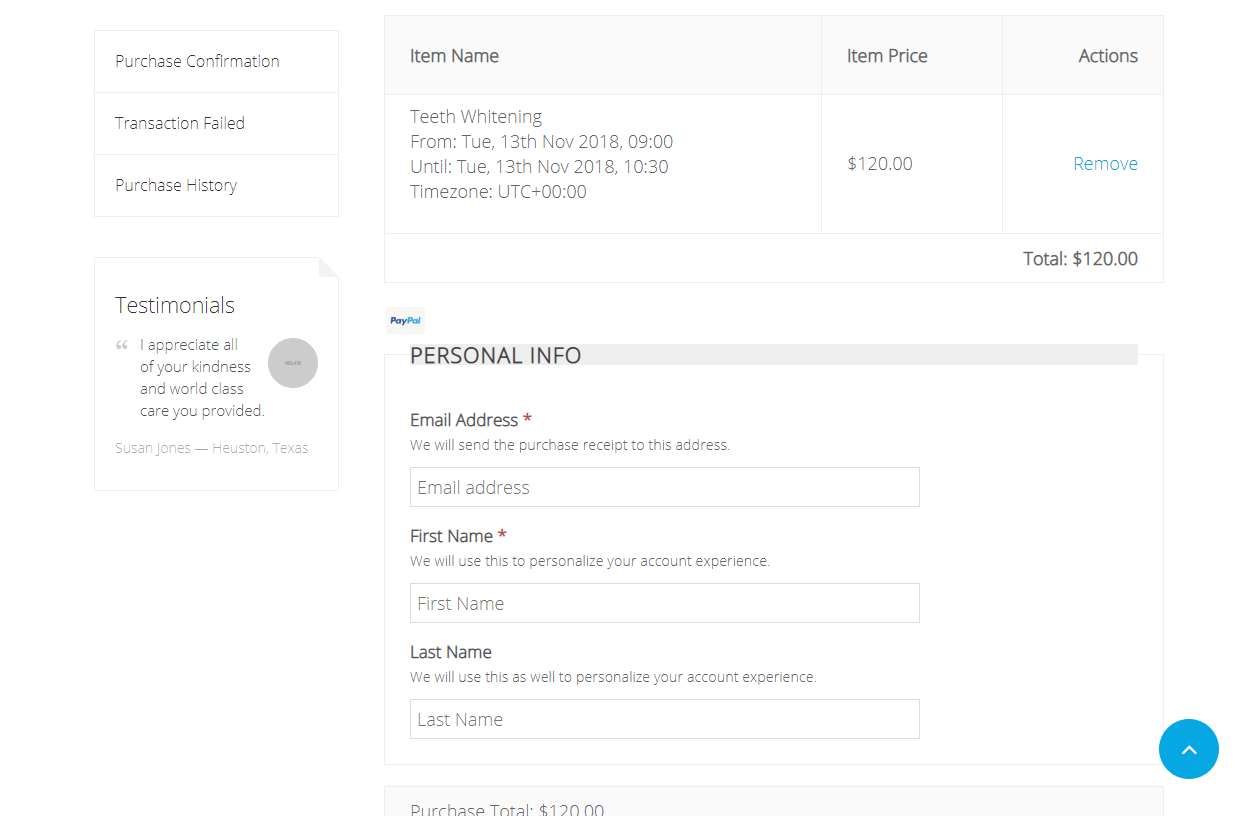
Once the appointment is in a visitor’s cart, they’ll be able to check out using the normal Easy Digital Downloads cart functionality, which means that you can use any Easy Digital Downloads gateway to accept payments:
How To Set Up Your Bookings Site: Step-By-Step
To get started, I’ll assume that you already have your theme set up. Other than that, I’ll cover everything that you need to to do to start accepting bookings.
If you’re using a theme other than Clinic Pro, there’s a chance you might need to tweak some settings for a good fit. That’s because EDD Bookings is based on Easy Digital Downloads, so it really depends how your theme handles styling Easy Digital Downloads’ content.
Step 1: Install Easy Digital Downloads And EDD Bookings
To get started, make sure that you install both the free Easy Digital Downloads plugin at WordPress.org, as well as the premium EDD Bookings plugin. You need both for this to work. In fact, you won’t even be able to activate EDD Bookings until you install the Easy Digital Downloads plugin.
Step 2: Configure Basic Easy Digital Downloads Settings
Once you’ve installed both plugins, you’ll want to configure some important basic settings for each.
First, you need to configure some settings for the core Easy Digital Downloads plugin.
To do this, go to Downloads → Settings in your WordPress dashboard. You’ll want to:
- Add your store location in the General tab
- Add your logo, from name, and from email in the Emails tab
- Configure payment gateways in the Payment Gateways tab. EDD Bookings uses the Easy Digital Downloads checkout, so users won’t be able to complete their booking until you configure a payment gateway (unless you plan to make all of your bookable services free)
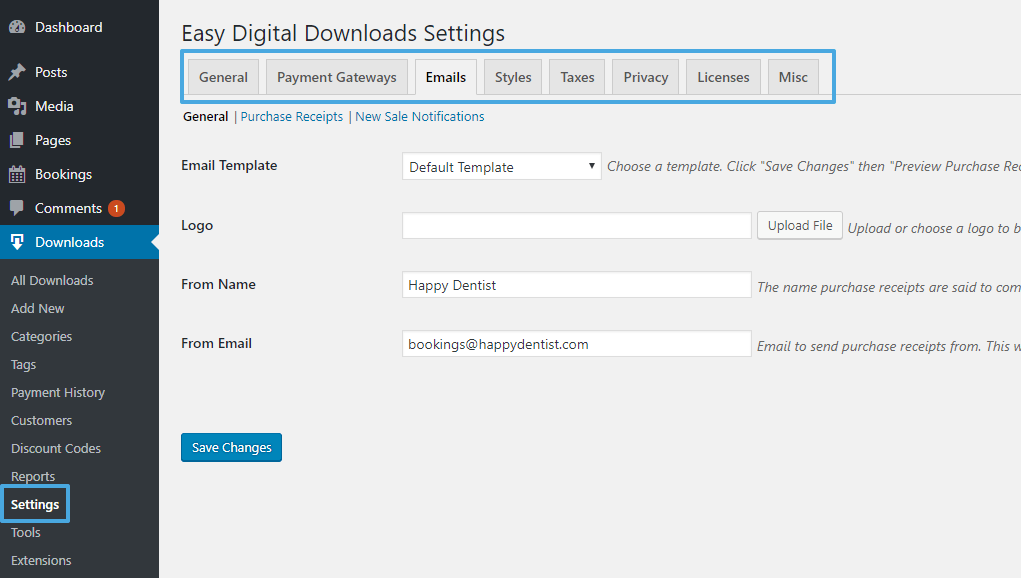
You should also peruse the other settings to see if you want to enable anything, like the built-in privacy policy functionality.
Step 3: Configure Basic Booking Functionality
Once you’ve configured the basic settings for the core Easy Digital Downloads plugin, you’ll next want to configure the defaults for the EDD Bookings plugin.
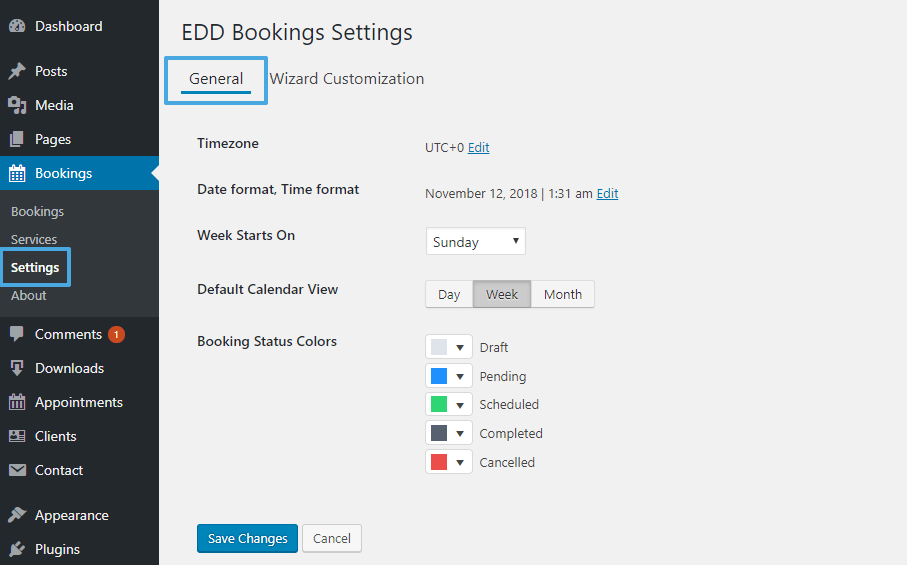
General Settings
To get started, go to Bookings → Settings and configure some basics like:
- Time zone
- When the week starts
- Booking status colors (this is for internal use. It will help you stay organized once you have a lot of bookings coming in)
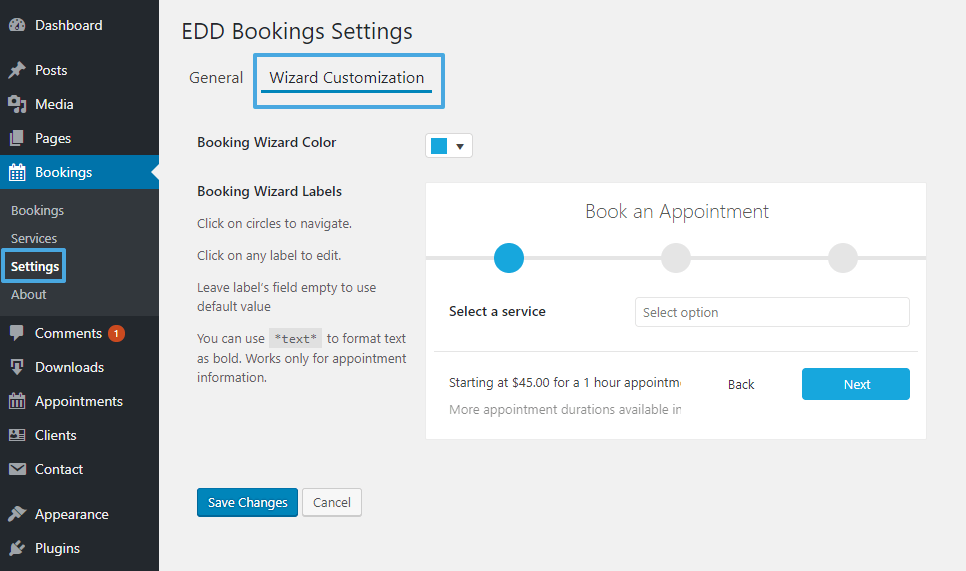
Wizard Customization
Once you’ve done that, pop over to the Wizard Customization tab. Here, you can configure the booking wizard that your website’s visitors will use to make their appointments.
At the top, you can choose the Booking Wizard Color:
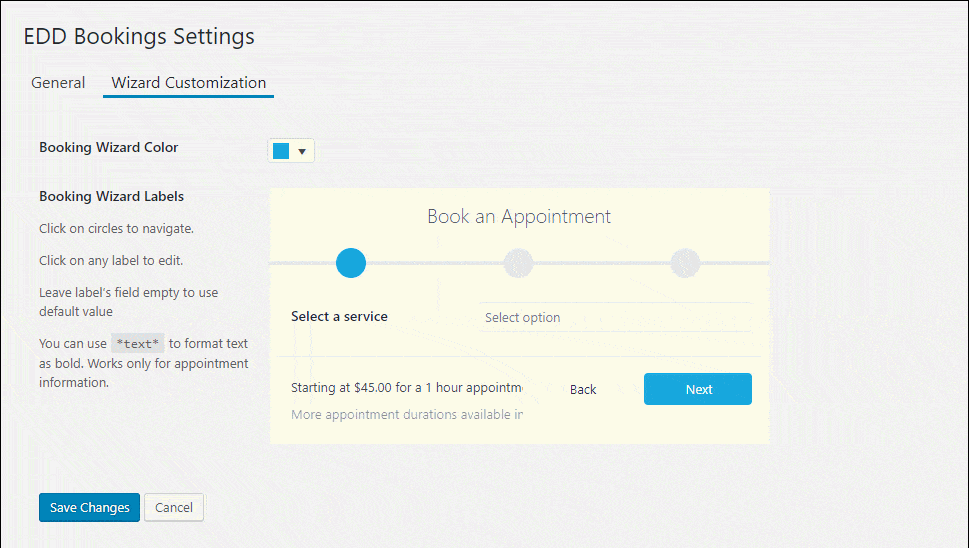
Then, the form itself is interactive.
For example, if you want to edit the text, you just click on the text on the form and type.
Similarly, you can click on the circles to navigate to different parts of the process and edit those parts:
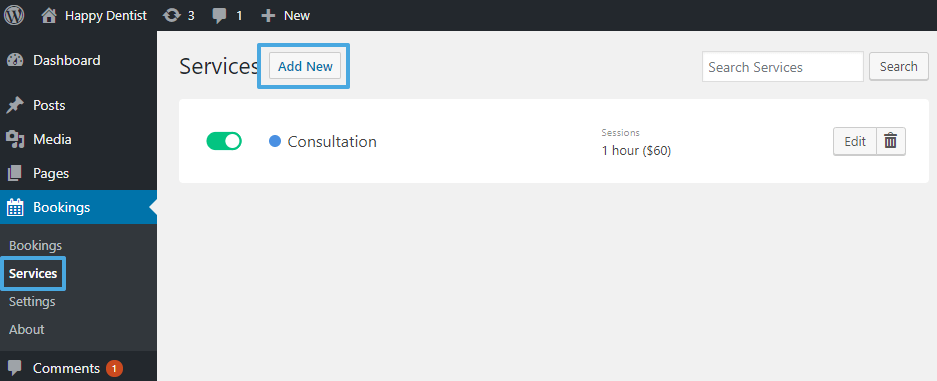
Step 4: Add Your Bookable Services
Next, you need to add your services. Visitors will be able to choose which service they want when they go to make their appointment.
For our dentist example, you might want services for things like:
- Basic consultation
- Teeth cleaning
- Teeth whitening
To create your first service, go to Bookings → Services → Add New:
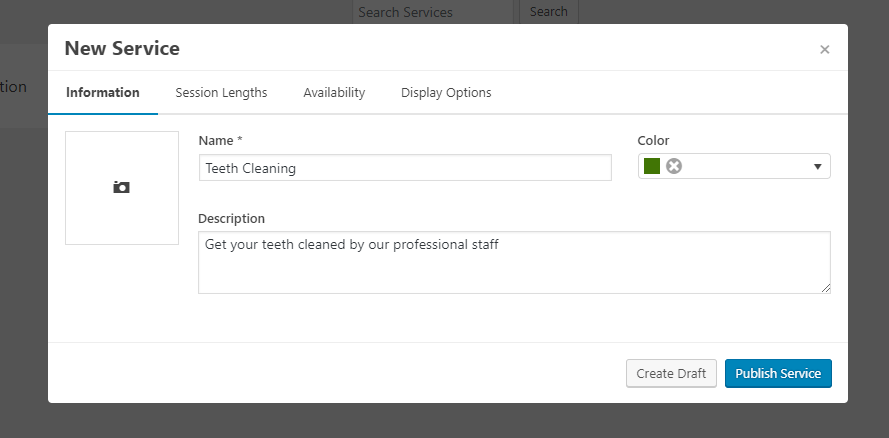
This will open a popup with 4 different tabs.
Let’s go through those tabs…
Basic Information
In the Information tab, enter the basic details for your service (you can also add an image, if desired):
Session Lengths
Then, go to the Session Lengths tab to indicate how long an appointment lasts. You can use the drop-down to change the unit and you can also enter a price (make the price 0 for free bookings):

You can create multiple durations if needed. Visitors will be able to choose their desired duration when they make their appointment.
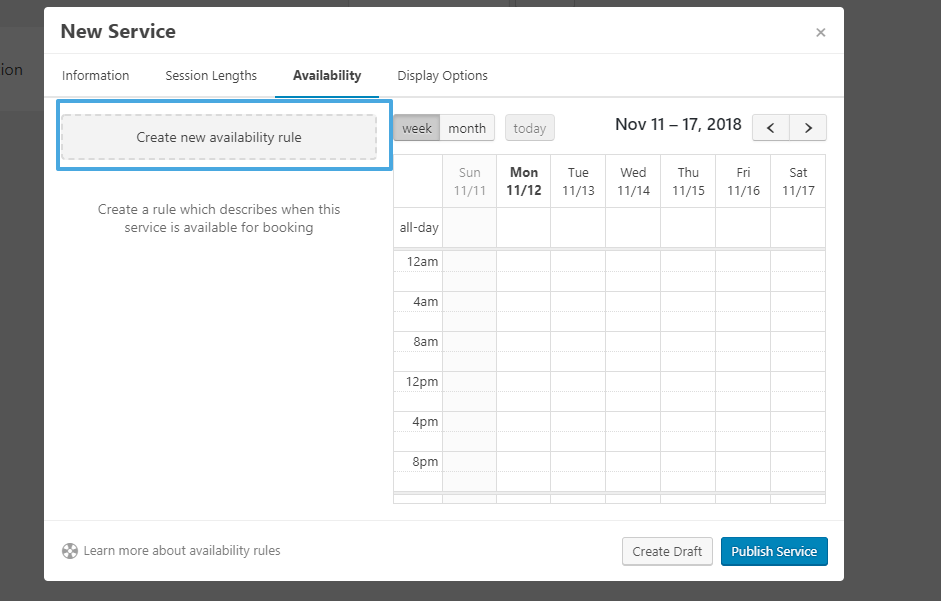
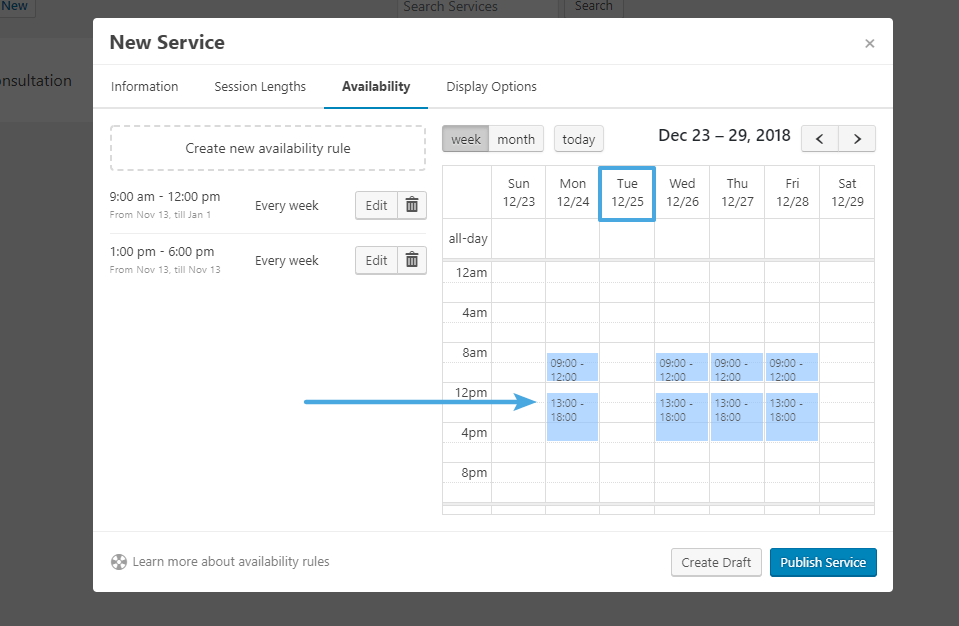
Availability Rules
The next tab – Availability – is the most detailed. Here, you can set up one or more availability rules. These essentially define when people can book this service. Most of the time, you’ll want to make them equal to your business hours. But, you also might have situations where you want to further limit a service’s availability.
For this example, let’s say that people can book the service from 9am to 6pm every weekday, but with a one hour break for lunch from 12-1pm.
Setting it up this way requires two separate rules.
To create your first rule, click the Create new availability rule button:
For this first rule, you’d want to make it from 9am to 12pm every weekday.
To do that, first enter details for the First available period. This is the first day that people can book appointments:
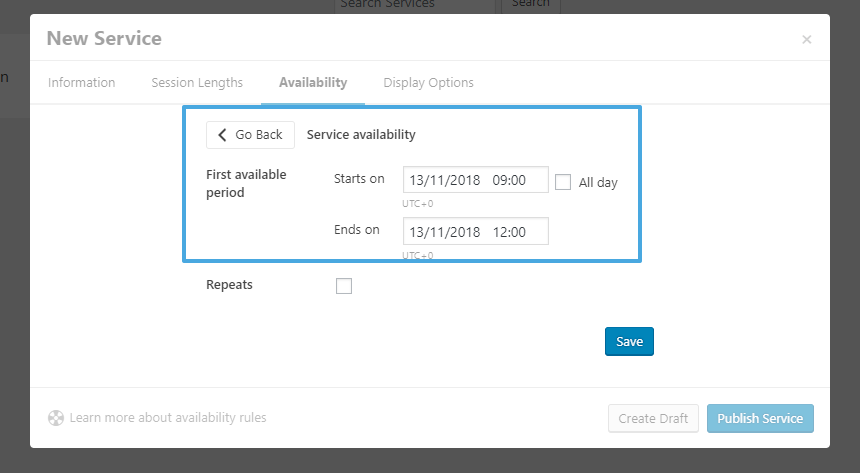
It might seem a little odd to have to do this for ongoing bookings. But once you manually enter information for the first week, you’ll be able to set up an automatic recurring schedule going forward.
Next, check the Repeat box to set up the repeating schedule. First, select Repeats after…1…week.
Then, check the boxes for Monday through Friday. And after that, you can choose the Stops repeating option (if you want it to go indefinitely, you can just set a date ~one year into the future.):
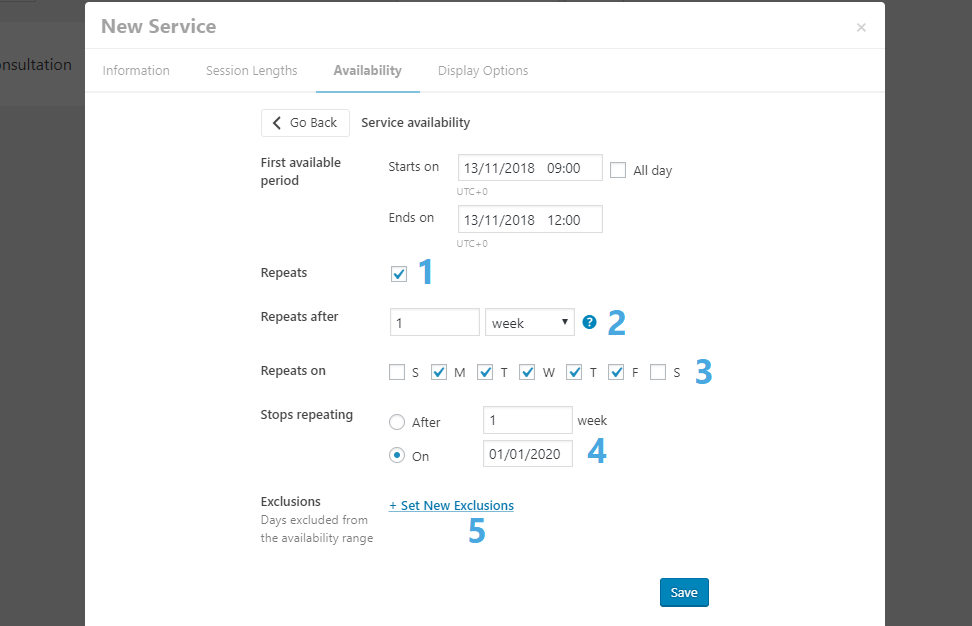
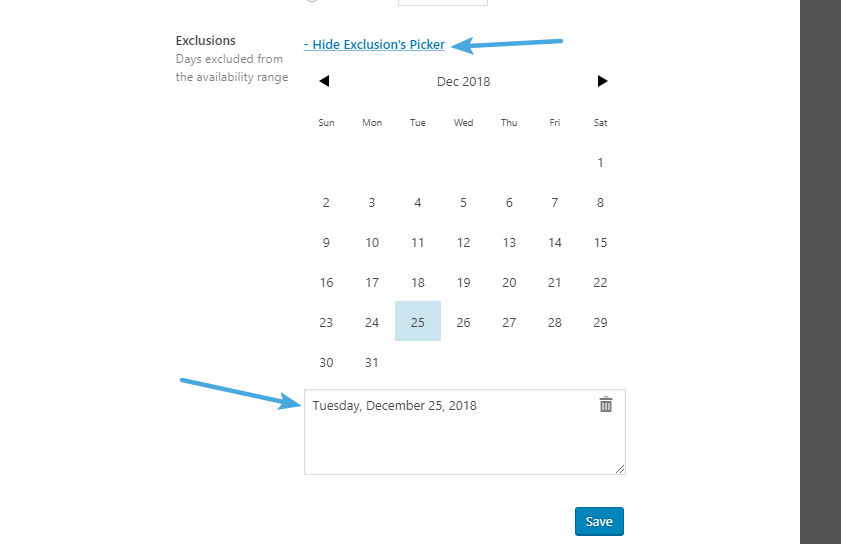
That sets up your basic schedule. But if you want, you can also use that Set new Exclusions button to exclude specific days from availability. For example, you could use it to exclude Christmas day:
Once you’re done, click Save.
Next, you need to repeat the same steps for the time block from 1-6pm.
Once you do that, you should see a summary of when that service is available. You can see that it goes:
- Monday through Friday
- 9am-12pm and then 1-6pm
And if you skip ahead, you can see that Christmas day is unavailable:
Display Options
Finally, go to the Display Options tab configure basic time zone settings. You can set a custom time zone for the service and, optionally, let clients manually change the time zone in the booking wizard:
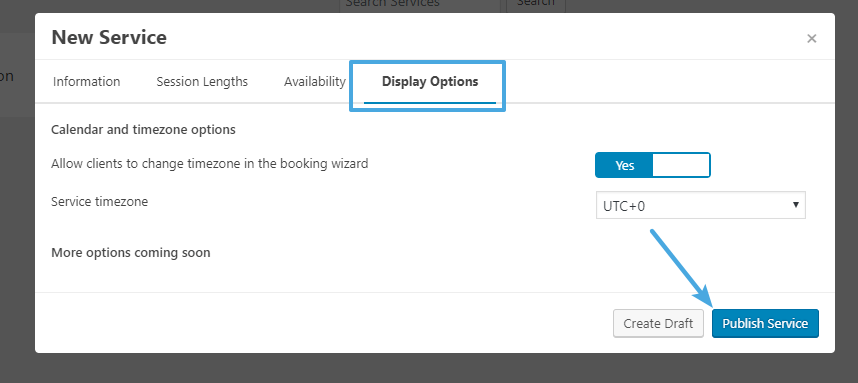
Once you’re done, click that Publish Service button in the bottom-right corner.
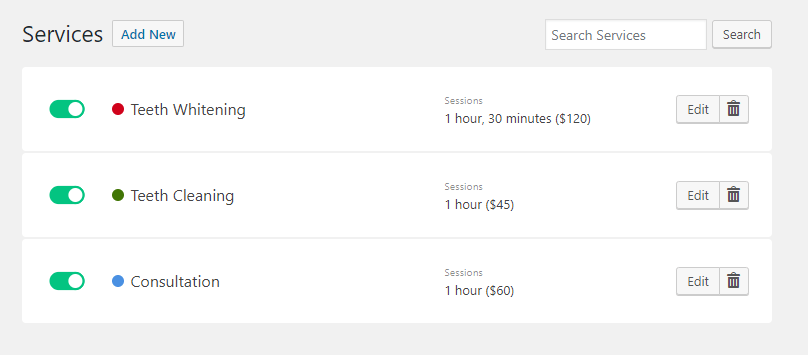
Then, repeat the process for all the services that you want to offer.
When you’re done, you should see a list of services like this:
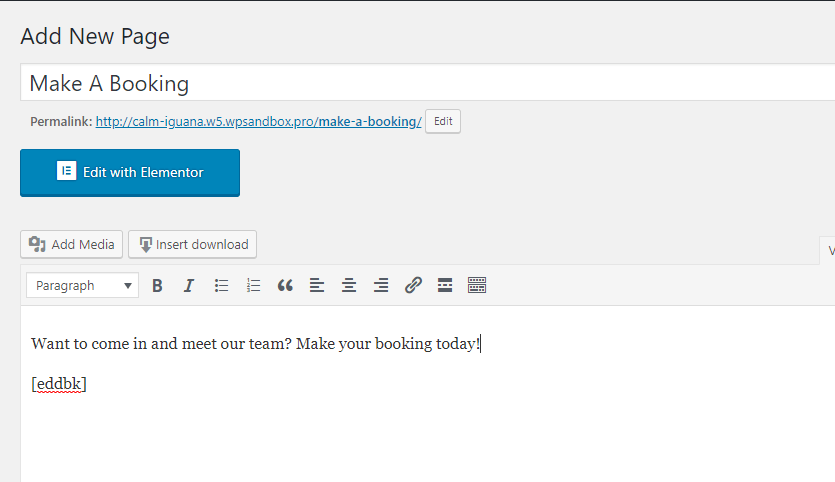
Step 5: Add Your Booking Form
Once you’ve added all of your services, you’ll use the EDD Bookings shortcode to display the appointment booking form on the front-end.
You can either:
- Use the
[eddbk]shortcode to let visitors select their own service from the full list of all your services - Use the
[eddbk service="id"]shortcode to pre-select a specific service
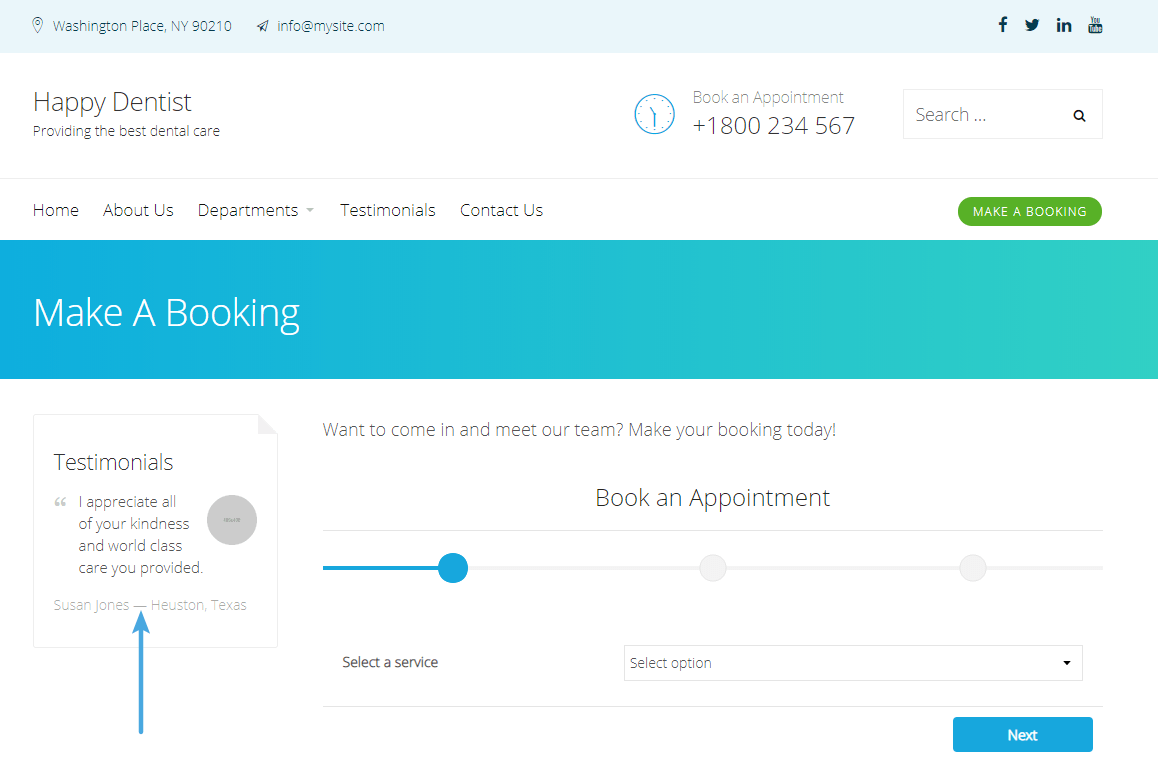
For this example, I created a Make A Booking page with the basic shortcode for all services:
Clinic Pro will automatically add a testimonial to the left of the booking form, which is a nice way to boost trust at a pivotal point in the process:
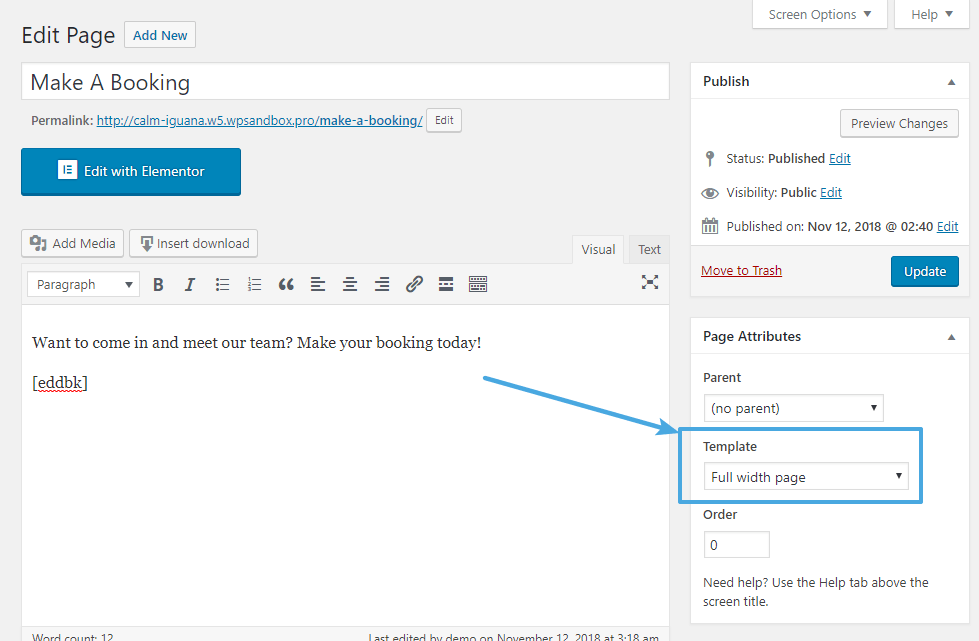
Alternatively, you could choose the Full width page template to make the booking form take up the entire page:
And that’s it! Visitors will now be able to start booking appointments at your site. Here’s how you’ll manage them…
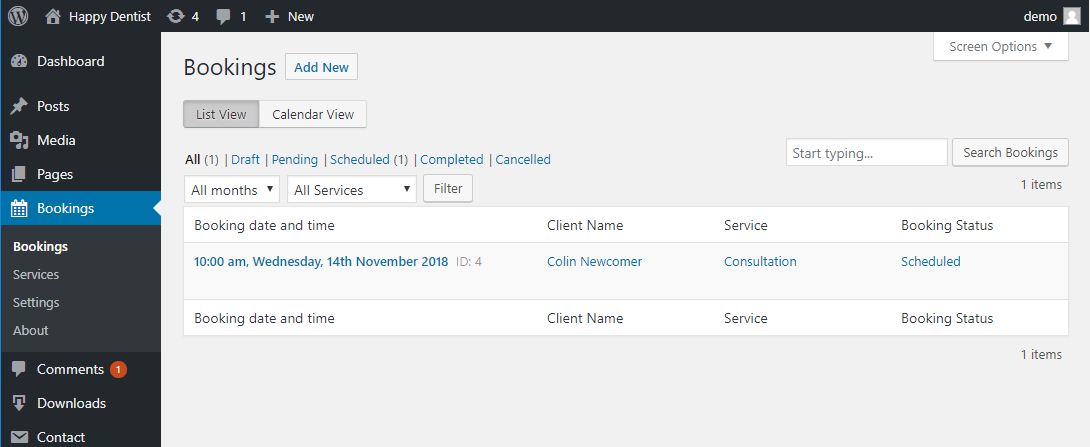
Managing Your Appointments On The Back-End
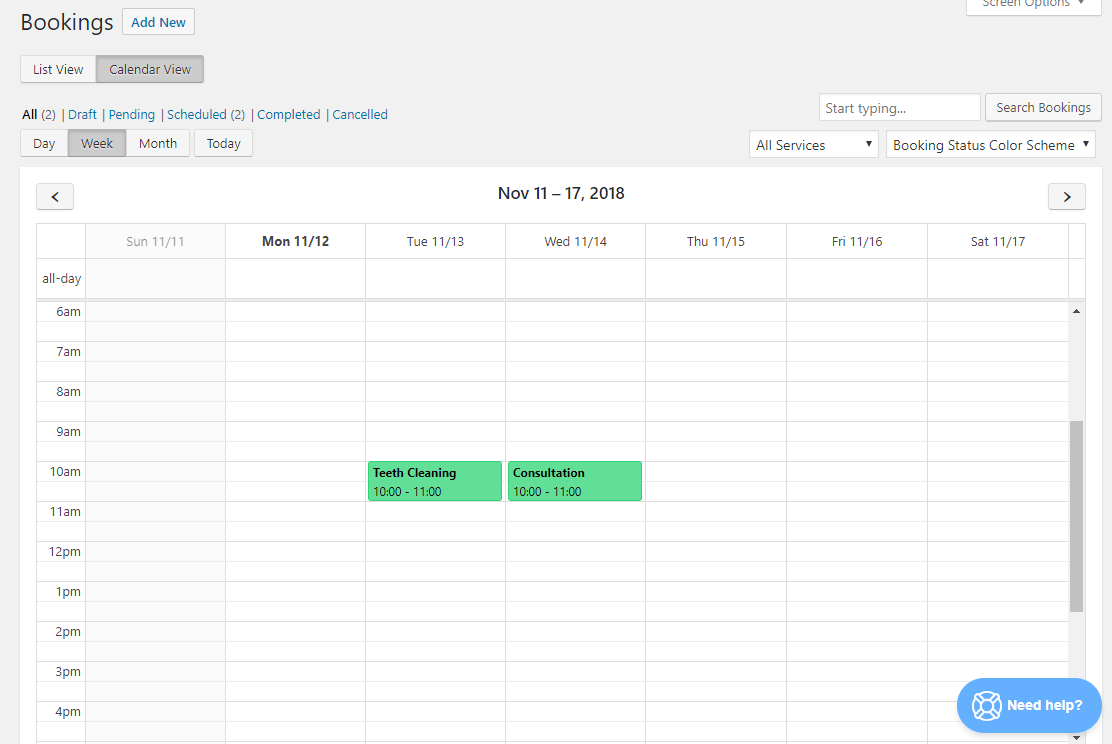
Once you start getting some appointments, you can manage them by going to Bookings → Bookings in your WordPress dashboard:
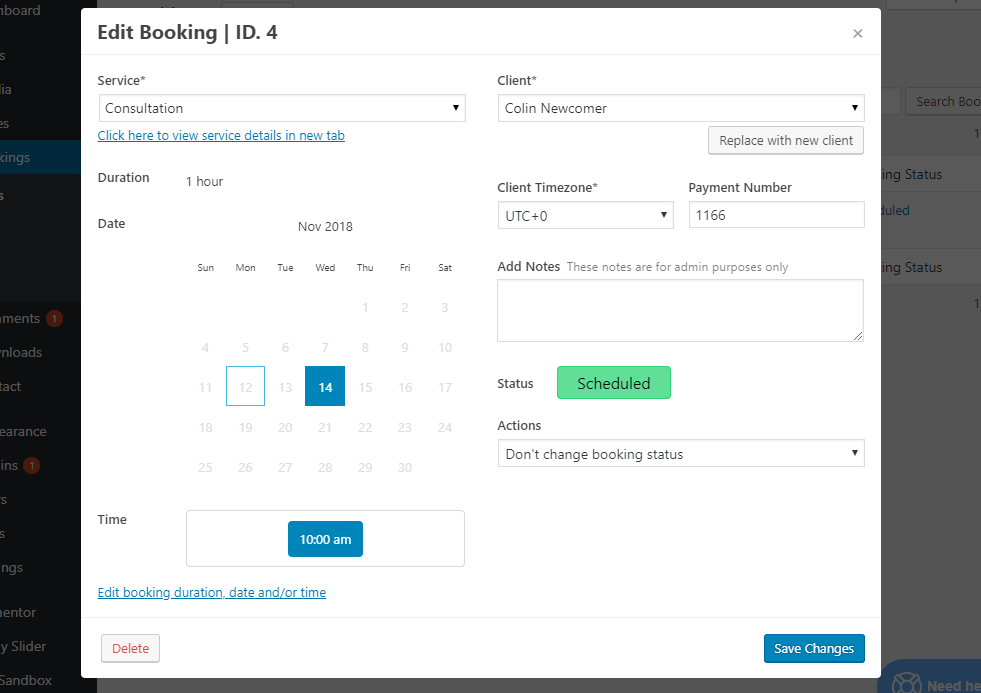
Clicking on a specific booking will bring up more details, including an option to add internal notes or edit the appointment time:
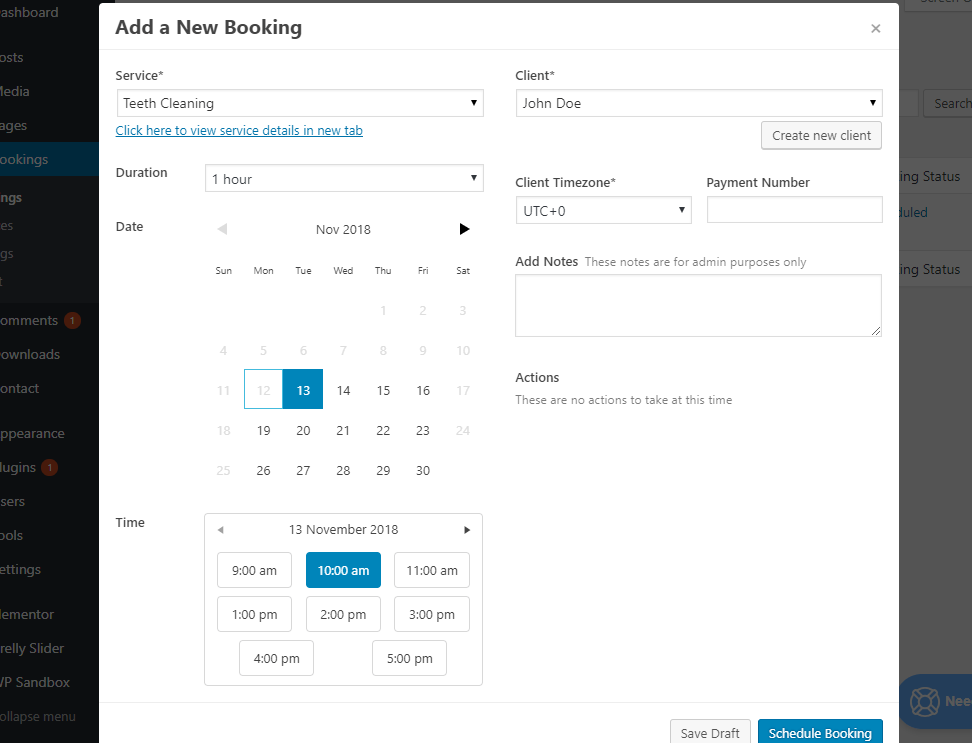
You can also manually add bookings by clicking Add New. This is helpful if someone wants to book over the phone or in person:
And you can also view all of your upcoming appointments in a calendar view if you prefer that to the list view:
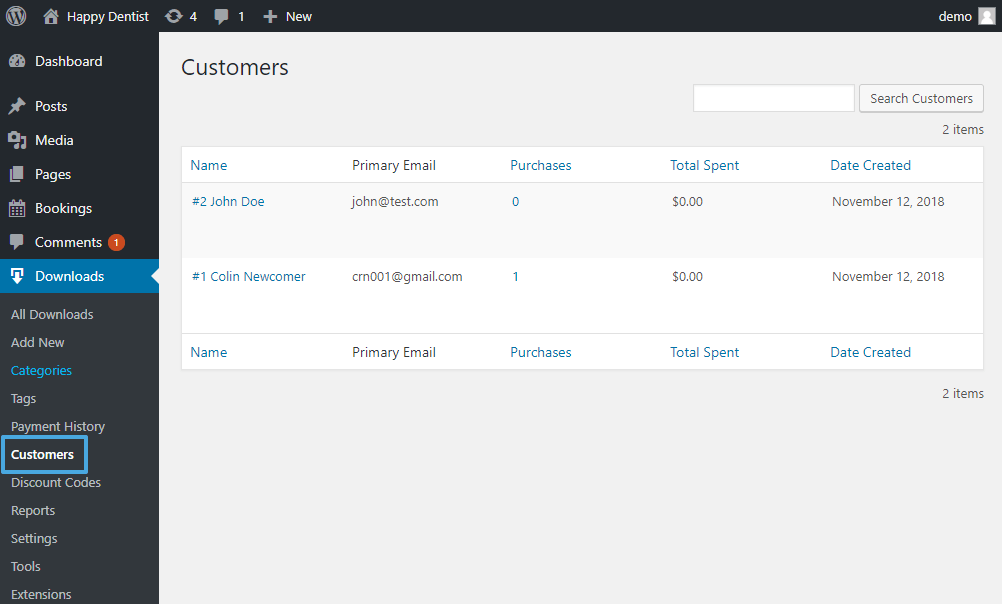
Finally, you can use the regular Easy Digital Downloads functionality to:
- Manage customers
- View payment history
- Create reports
- Etc.
Final Thoughts
With Easy Digital Downloads and EDD Bookings, it’s easy to add appointment booking functionality for your medical practice (or pretty much anything else!).
Our Clinic Pro theme works great with EDD Bookings right out of the box, so you won’t need any special configuration. Just follow this guide and you’ll be up and running in no time.
Have any other questions about using EDD Bookings with Clinic Pro to accept appointment bookings on WordPress? Leave a comment and we’ll try to help out!