


You’re here because you need to create a law firm website. And you know what that means…heaps of research, long talks with developers, and a $5-10k bill to top it all off. Right?
Ehh, maybe not. See, there’s this thing called WordPress that makes it easy for you to create a website, even if you don’t know the first thing about code. WordPress now powers over 27% of websites. It’s the real deal.

And here’s the cool thing:
WordPress can help you create a website for your law firm in an afternoon, not a month. And best of all? It won’t even cost you a hundred dollars.
Don’t believe me? I’m going to show you how in this post.
All you’ll need is web hosting, a domain name, WordPress, and our free Judgement WordPress theme.
Step 0: The Assumptions
My attempt is to write this guide so that anyone can create an awesome law firm website. So whether this is your first site or you’ve already created a few websites, you’ll end up with a beautiful final product.
But in the interest of brevity, I’m going to make a few assumptions:
- You can choose your own hosting and pick a domain name for your firm. When in doubt, we recommend SiteGround. They’re affordable, have good performance, and give you a free domain name.
- You can install WordPress on your hosting (your host will make this very easy for you). If you choose SiteGround, they’ll even preinstall WordPress for you.
Step 1: Install & Activate Judgement and Required Plugins
Ok, as I said, I’m assuming that at this point you’re staring at a fresh, blank WordPress install. From there, you’re ready to jump straight into creating your site. By the time you get up to grab your next cup of coffee, you should have a finished website for your firm. I promise!
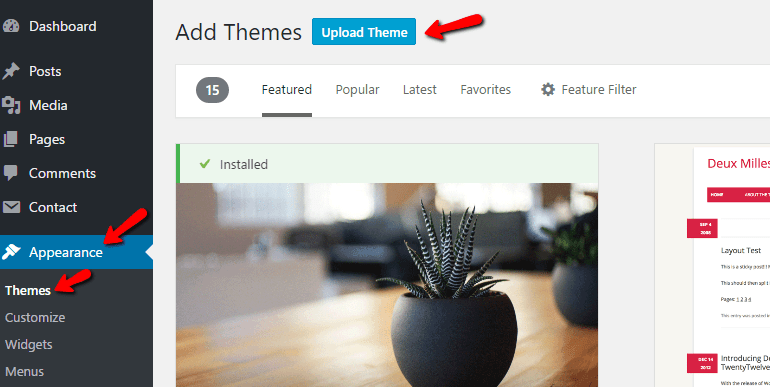
The first thing you need to do is install our free Judgement theme. Download Judgement and then go to Appearance → Themes → Add New → Upload Theme in your WordPress dashboard:
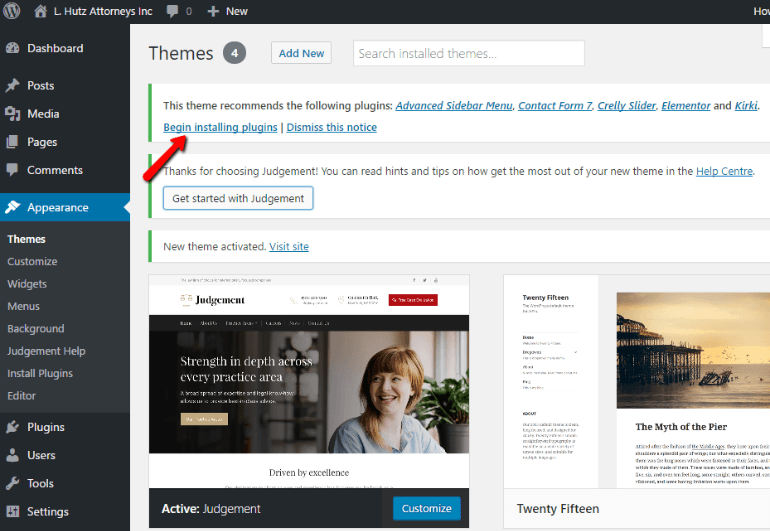
Once you install and activate Judgement, the next thing you’ll want to do is install the required plugins. Don’t worry – all you need to do is click a few buttons and WordPress will handle the rest.
Once you activate Judgement, you should see a prompt at the top of the screen telling you to Begin installing plugins. Just give that a click:
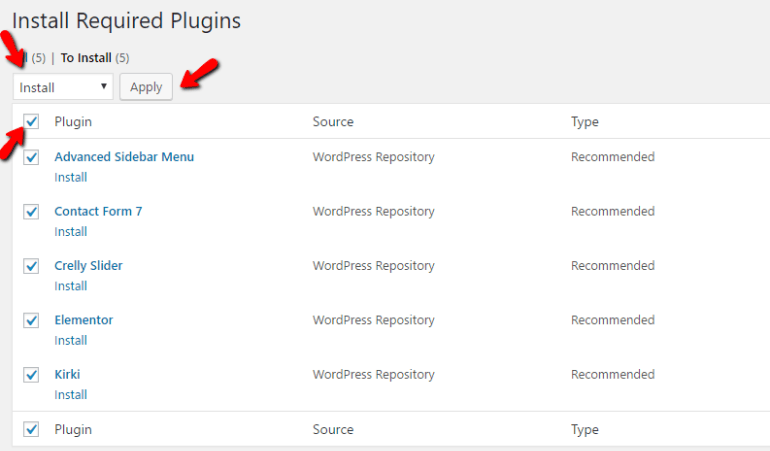
On the next page, you can tick the box to select all plugins. Then choose Install from the drop down and click Apply:
And now WordPress will take over and do the rest of the work for you:
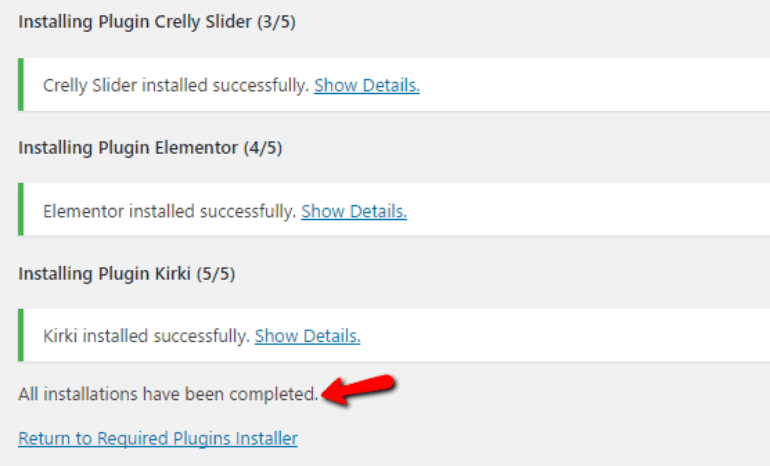
Pretty simple so far, right?
Step 2: Import the Demo Data
Some WordPress themes put out demos that look perfect, but when you try to make your website look like the demo, you’re in for hours and hours of frustration.
Don’t worry – Judgement doesn’t leave you out there all by yourself. You can quickly import all of the demo data to make your site look exactly like our demo site. And it’ll only take you a couple minutes.
Then, all you need to do is go through and customize the text and branding to fit your law firm.
First, you’ll want to bring in all of the demo posts. These will automatically set you up with a bunch of important pages like:
- About
- Contact
- Practice Areas
- etc.
To do that, head to this page and download judgment-demodata.xml at the bottom. Then, in your WordPress dashboard, you need to go to Tools → Import. Scroll to the bottom and install the WordPress importer:
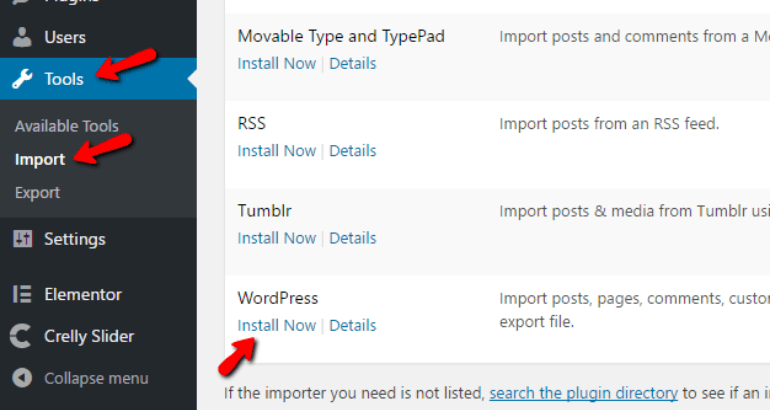
Then run it and upload the demo data. It’s a good idea to assign the posts to your WordPress account rather than our demo account:

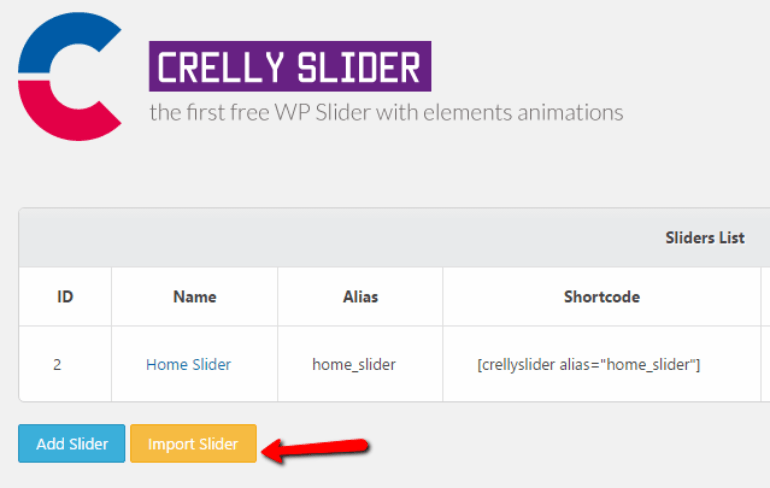
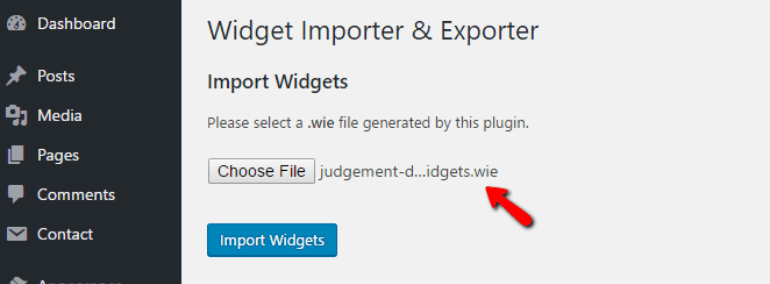
And voila! Just like that, you’ve got your pages all laid out. To finish up the import process, you’ll also need to upload demo content for the slider (those neat rotating images on the homepage) and widgets (these handle displaying your phone number, address, etc.). You can also find both of those files on the same page as the other demo content.
For the slider, you just need to upload the provided .zip file in the Crelly Slider tab:
And for the widgets, you just need to install the Widget Importer & Exporter plugin and upload the provided .wie file. If you’re not sure how to install a WordPress plugin, check out our support docs:
As long as you’ve got the strength to click your mouse button a few times, you’ll cruise through the import process. Within the first 5-10 minutes, your site will look exactly like this:
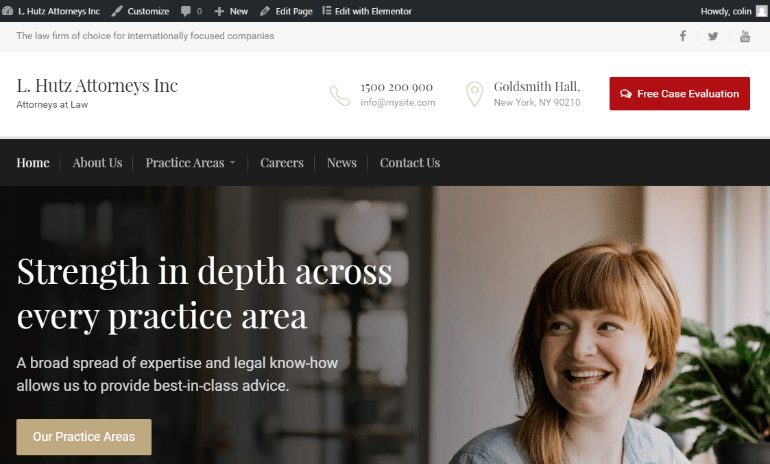
By my watch, that leaves another 50-55 minutes for perfecting your site.
Step 3: Upload a Logo and Customize Your Site’s Style
Now come the steps where you can really make your firm’s website your own. First, I’ll show you how you can upload a logo and change your site’s colors and fonts. Then, I’ll show you how to replace all of the demo content with the proper information for your law firm.
Judgement uses the official WordPress Customizer to make all of its customizations. If you’re not familiar with WordPress, all that means is that you’ll be able to preview any changes you make in real time before you save them to your live site.
Get started by heading to Appearance → Customize on your dashboard sidebar.
Let’s start with the logo – to upload your own custom logo, you just need to go to General Settings → Site Identity. Choose Select logo and upload your logo:
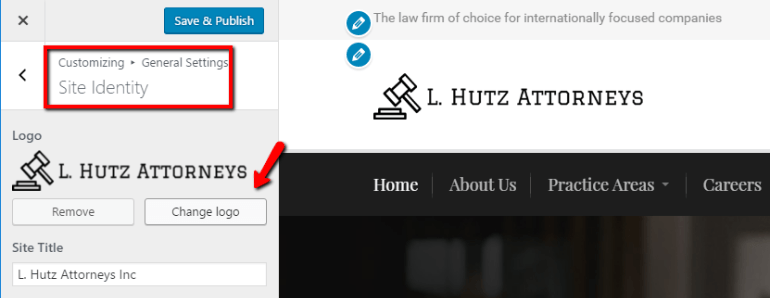
Once you add your logo, you should see that change immediately reflected on the preview on the right It’s that easy! If you don’t already have a web-friendly logo, this is one part where you might want to consult a professional designer (because my example is what happens when you try to go it alone!).
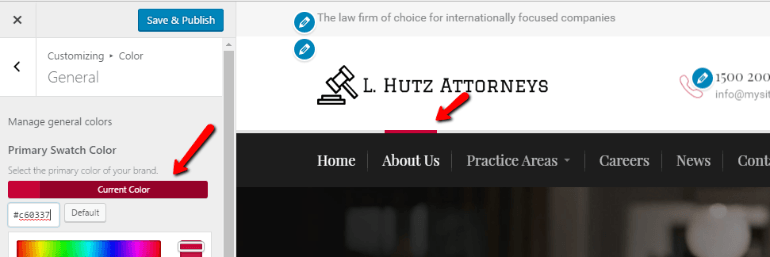
Another thing you’ll likely want to do is customize the colors to fit your law firm’s brand.
To do that, you’ll use the Color tab of the same interface. For example, to set the primary color for your site, you just need to go to Color → General. Then choose Primary Swatch Color.
You can immediately preview any changes on the right. For example, switching from the tan to a vibrant red immediately changes the color when users hover over your menu options:
While it’s quite easy to go through all of the color and font options to customize them for your law firm, Judgement is set up so that you don’t need to. If you’re happy with how Judgement looks out of the box, there’s no need for you to change anything here!
Step 4: Add Your Law Firm’s Information to the Provided Widgets
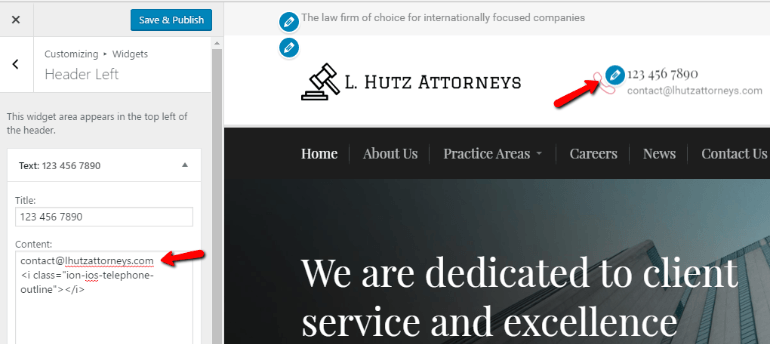
Did you notice all of those pencil icons floating around in the WordPress Customizer interface?
They’re not just there for decoration! They make it a breeze to update all of the widgets for your site. As I mentioned briefly before, widgets are basically static information that is the same for every page on your firm’s site. Examples include your phone number, contact email, address, etc.
To update a widget with your own firm’s information, you just need to click on it. Then WordPress will automatically open the editing interface. Easy, right?
To add your own information, you just need to replace the demo content with your own:
It’s just as simple to update all of the other basic information.
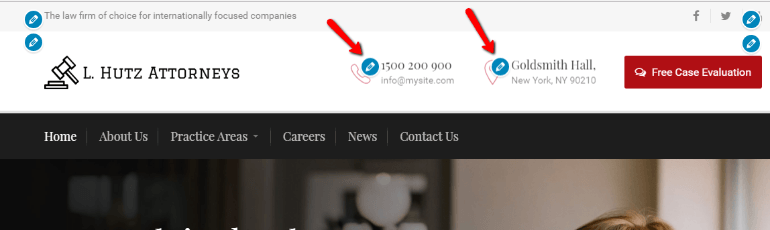
Let’s do another example to drive home that point – say you want to update your firm’s physical locations as listed at the bottom of your website. Just head down to the bottom and click the pencil icon again. Then replace the demo content with your own:
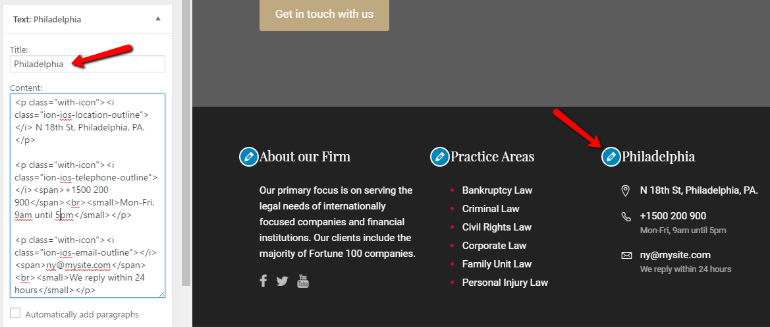
As you can see, there is a little HTML code mixed into the content. But don’t worry if you don’t know HTML. All you need to do is replace the actual text content with your own – you can leave all of the HTML alone.
Once you’ve updated all of the widgets, you’re ready to get out of the WordPress Customizer. Just make sure to click Save & Publish before you exit.
Step 5: Update Your Homepage, Practices Areas, Etc.
Once you’ve updated the widgets, all of the information at the top and bottom of your firm’s site should be your own. Now it’s time to handle the stuff in the middle!
You’ll want to update the practice areas to reflect your firm’s specialties, as well as your homepage, about us page, and others.
Removing or Editing Practice Areas
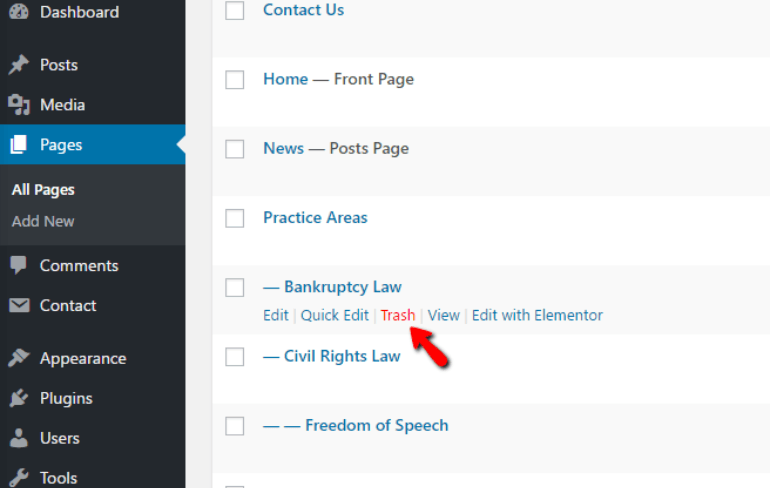
It’s unlikely that your law firm practices in all of the demo areas included in Judgement. So you’ll first want to remove any unnecessary practice areas.
To do that, head to Pages tab in your WordPress dashboard. To delete a practice area, just hover over it and click the Trash button:
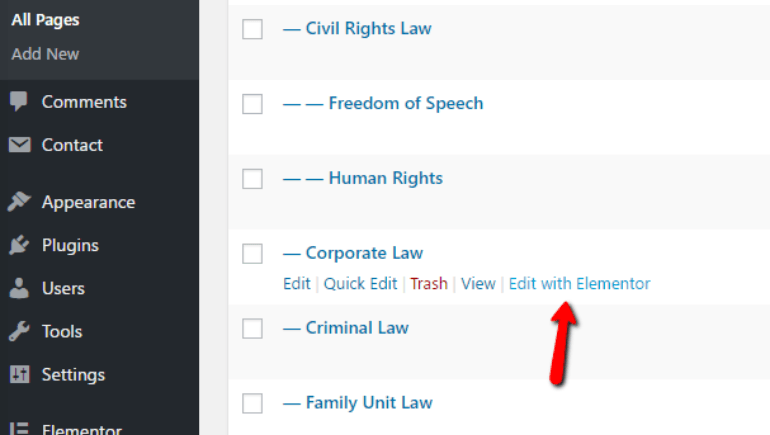
Once you’ve winnowed them down to the areas relevant to your firm, you’ll want to update the actual text on each practice area page.
To edit your pages, you’ll use a tool called Elementor. It lets you create detailed, well-styled pages without needing to know any code.
To use it, just hover over the practice area you want to edit and click Edit with Elementor:
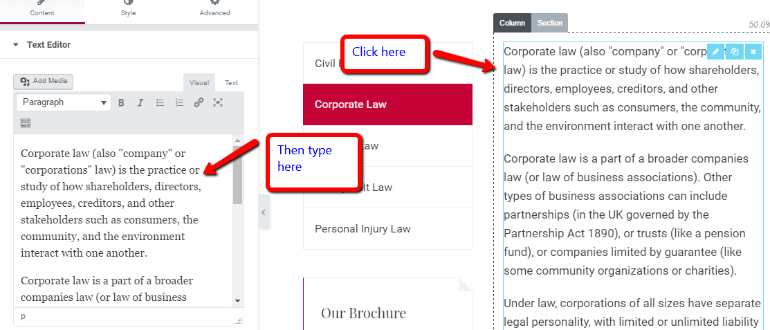
Elementor is something called a “visual page builder”. That means you’ll see things on your page in the same “view” as your potential clients will see it.
For example, to edit a bit of text on your page, you just need to click on it. Then, you can replace the demo content with your own on the left:
You can edit the other elements in a similar way – just click on them to add content.
If you need any help choosing images for your pages, we’ve collected all of the images that we used on the demo site. They’re all free, CC0 images (free to use commercially), so you can add them to your site if you don’t want to spend time digging around for images.
Updating Other Pages On Your Site
You can use the exact same process to update all of the other pages on your site. For example, if you want to add pictures of your firm’s attorneys to the About Us page, you just need to start editing it with Elementor.
Then, you can quickly upload your own portraits to replace the demo content:
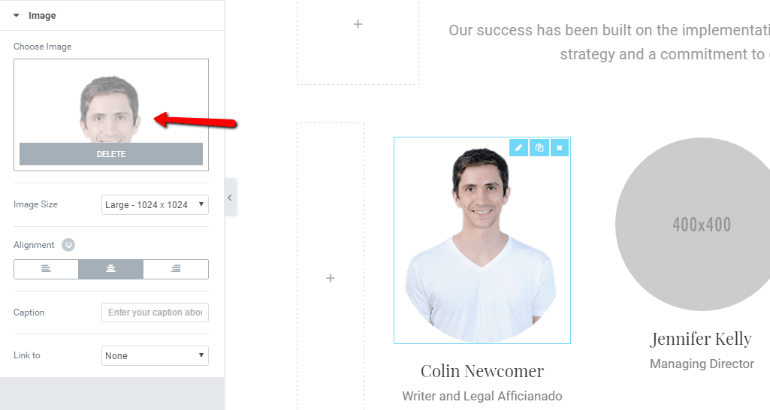
Using Elementor to edit your pages is simple – the only part that might take some time is actually writing the unique content for your firm and gathering all the needed images of key firm stakeholders.
Updating the Homepage Slider
At this point, you should have all of the widgets and pages updated. The only other content you might want to update is the slider.
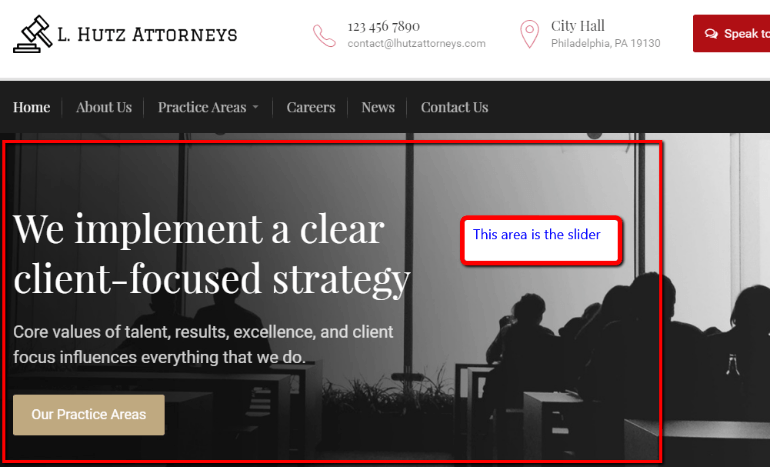
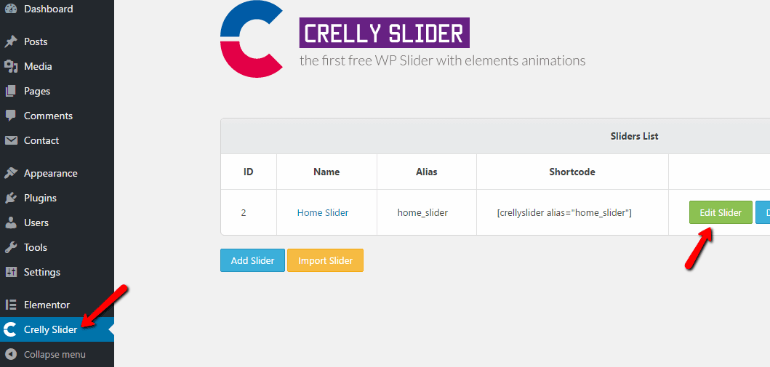
To create the slider, we use a WordPress plugin called Crelly Slider. So to edit the slider on your firm’s homepage, you’ll need to head to Crelly Slider → Edit Slider:
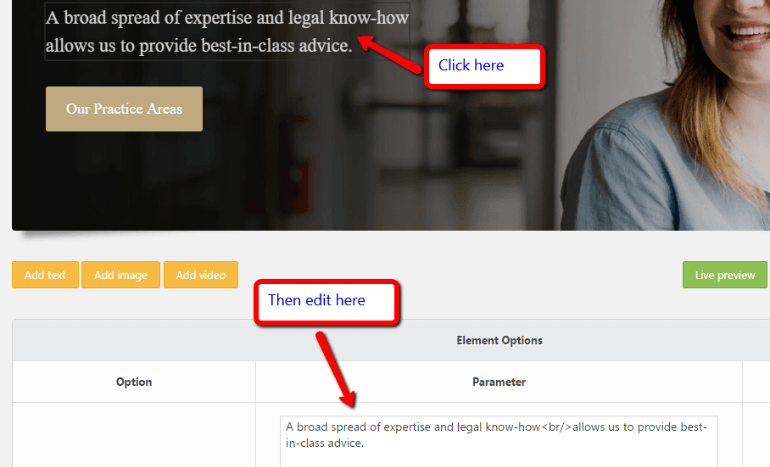
Then click Edit Slides. Just like with Elementor, all you need to do is click on the part of the slide you want to edit. Then, you can change the text as needed:
Enjoy Your Law Firm’s New Website
And that’s it! You just created a website for your law firm without needing to know a single line of code. And best of all, you did it quickly and without needing to take out a second mortgage.
We tried to make it as simple as possible to create a law firm website using Judgement, but we recognize that you might run into a situation where you need a little help. So, if you find yourself wanting a bit of a helping hand, you can always upgrade to Judgement Pro and get dedicated support.